
How to Create a CI/CD Pipeline Using CircleCI
In modern software development, automating your build, test, and deployment processes is critical for speeding up delivery and maintaining high code quality. Continuous Integration and Continuous Deployment (CI/CD) pipelines make this possible.
CircleCI is an industry-leading platform for implementing CI/CD. In this post, I’ll guide you step-by-step on how to create a simple CI/CD pipeline using CircleCI for a straightforward Python application.
What Is CircleCI?
CircleCI is a cloud-based CI/CD tool that automates building, testing, and deploying your projects. It integrates seamlessly with GitHub and Bitbucket repositories, allowing you to trigger builds automatically on code changes.
Step 1: Setup a Python Project
Create a basic Python project structure as below:
yourproject/
├── .circleci/
└── config.yml
├── book/
├── library/
├── tests/
└── test_app.py
├── requirements.txt
📁 The .circleci/ directory holds your CircleCI configuration file.
📁 The tests/ folder contains your unit tests.
📁 The requirements.txt file lists all dependencies.
You can view this minimal working example in the GitHub repository here:
👉 GitHub Repository This basic app defines a function and a test verifying it works correctly.
📘 Note: For Python projects using pytest (as in your config), the typical naming conventions are: Test files should be named starting with test_ or ending with _test.py (e.g., test_example.py or example_test.py). Test functions should be named starting with test_ (e.g., def test_addition():).
Step 2: Add your requirements file
Create a requirements.txt file in your project directory with the dependencies for your tests, for example:
pytest~=8.3.5
Step 3: Add CircleCI Configuration
CircleCI uses a config file to define what steps to run on each code push. This file lives in your project at .circleci/config.yml.
Create the .circleci directory and create config.yml inside it with the following content:
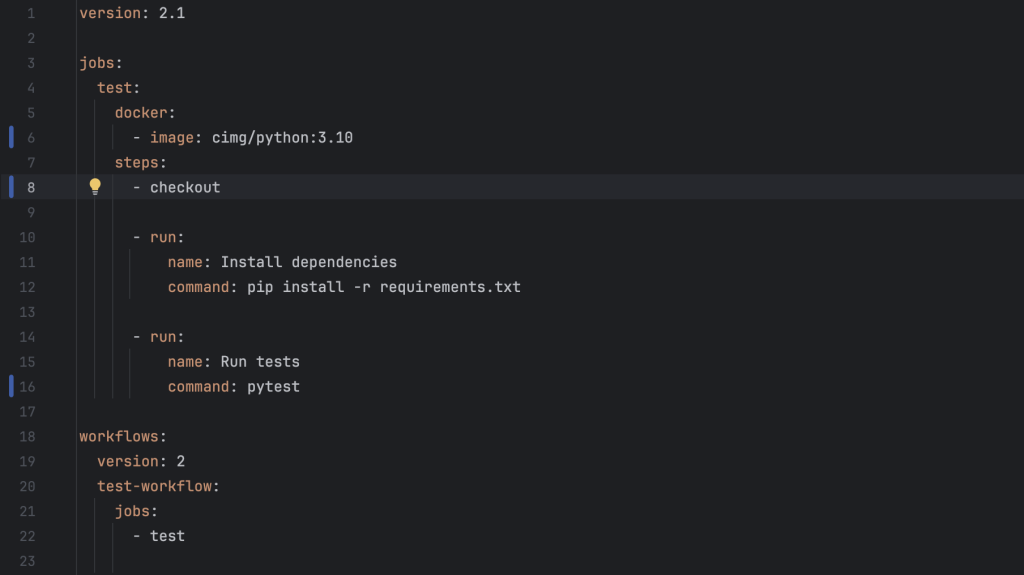
What This Configuration Does

Step 4: Connect Your Repository in CircleCI
- Go to CircleCI and sign in with your GitHub or Bitbucket account.
- Click Add Project and find your Python repository.
- Select your repo and click Set Up Project.
- CircleCI will detect your
.circleci/config.ymlfile and offer to start your builds.
Step 5: Push Code and Watch Your Pipeline Run
Commit and push your code (including .circleci/config.yml) to your repository:
git add .
git commit -m "Add CircleCI config for Python app"
git push origin main
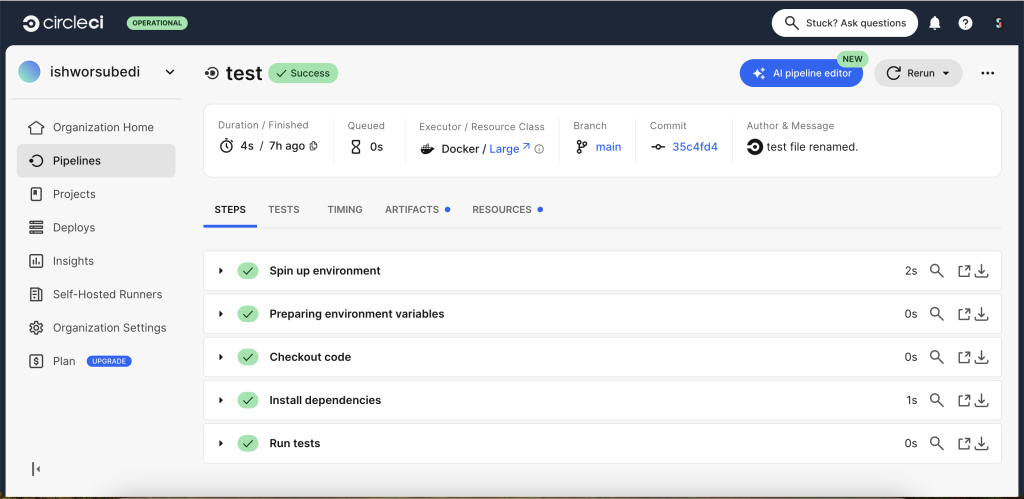
CircleCI will start your pipeline automatically.
You can monitor the build progress, see the logs, and verify that your tests pass as shown below.
Optional Step 6: Adding Deployment (Example)
If you want to automatically deploy your Python app after successful tests (for example, to AWS, Heroku, or a server), you can add another job to the workflow. For this simple example, deployment details will depend on your hosting environment.
Tips for a Successful Python CI/CD Pipeline
- Use virtual environments to isolate dependencies.
- Cache dependencies in CircleCI to speed up builds.
- Use CircleCI Orbs for common Python tasks to simplify your config.
- Write comprehensive tests to ensure code quality.
- Monitor builds on CircleCI dashboard and fix failures quickly.
Conclusion
You now have a fully functional CI/CD pipeline for a simple Python application using CircleCI! This setup automatically runs your tests on every code push, improving code quality and developer confidence.
As your project grows, you can enhance the pipeline by adding deployment steps, notifications, or parallel jobs.
Try it out — automation will save you time and catch bugs earlier!
If you liked this article or have questions, feel free to reach out or leave a comment.
Happy coding!
Nischal
Thank you ishworsubedi sir